Two Ways to Install Shopz Mart Theme.
01 Install with Quickstart Package
02 Install with Template Package
01 Install with Quickstart Package
- STEP 1
- STEP 2
- STEP 3
02 Install with Template Package
Opencart Installation
For Deafault installation of Opencart, you just need to follow these steps Click here
After you complete the installation of Default opencart, please follow below steps to install themes
- Step 1 - Unzip the Shopz.zip package.
- Step 2 Select your layout : Homepage_01 or Homepage_02 or Homepage_03
Just Overwrite Below Folders.
"admin" (Overwrite this folder)
"catalog" (Overwrite this folder)
"image" (Overwrite this folder)
NOTE : After File Replace You May Get ERROR(COULD NOT LOAD FILE) ON FRONT SIDE. Don't worry, Just Follow below Step
After Completing Installation Steps Must be Select Theme Store In Admin Panel for that:
For Admin panel : your website name/admin (For Example: example.com/admin)
Enter Your Username & Password .
From Default Home Go to Extensions > Extensions > Themes > Your Store > click on "Edit" Button.
Next : Select > default
Click On : " Save" Button
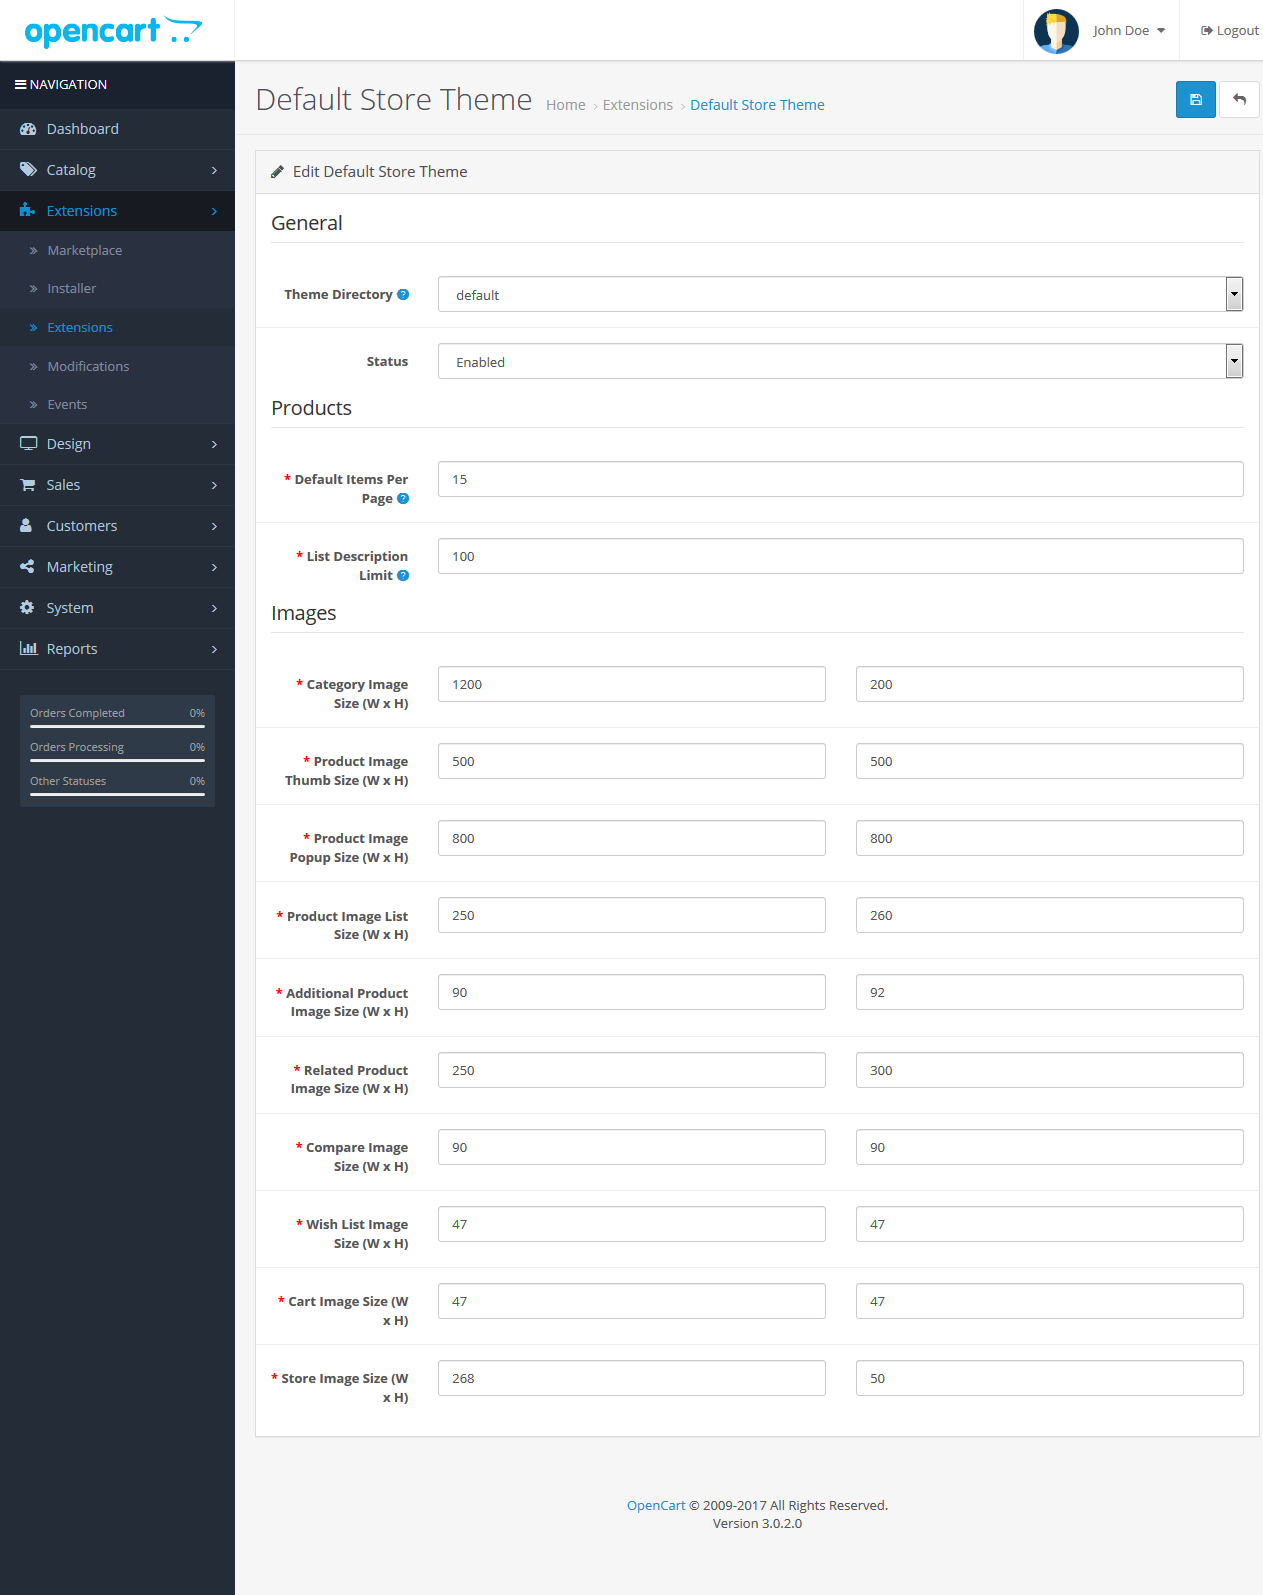
Step2 : Logo and Image size settings
Logo setting : Go to System > Setting > Edit > Images
From Store Logo you can upload your logo image.
For Image Size setting
Images setting : Go Extensions > Extensions > Themes > Smart Shop-store-1 > Edit
Change category image size to: 1200 X 200
Change product image thumb size to:500 X 500,
Change Product Image Popup Size to:800 X 800,
Change product image list size to:250 X 260 ,
Change additional product image size to:90 X 92,
Change related product image size to:250 X 300 ,
Change cart image size to:47 X 47 ,
Compare Image Size (W x H) : 90 X 90
Wish List Image Size (W x H) : 47 X 47
Wish List Image Size (W x H) : 268 X 50
Click on. “Save” button

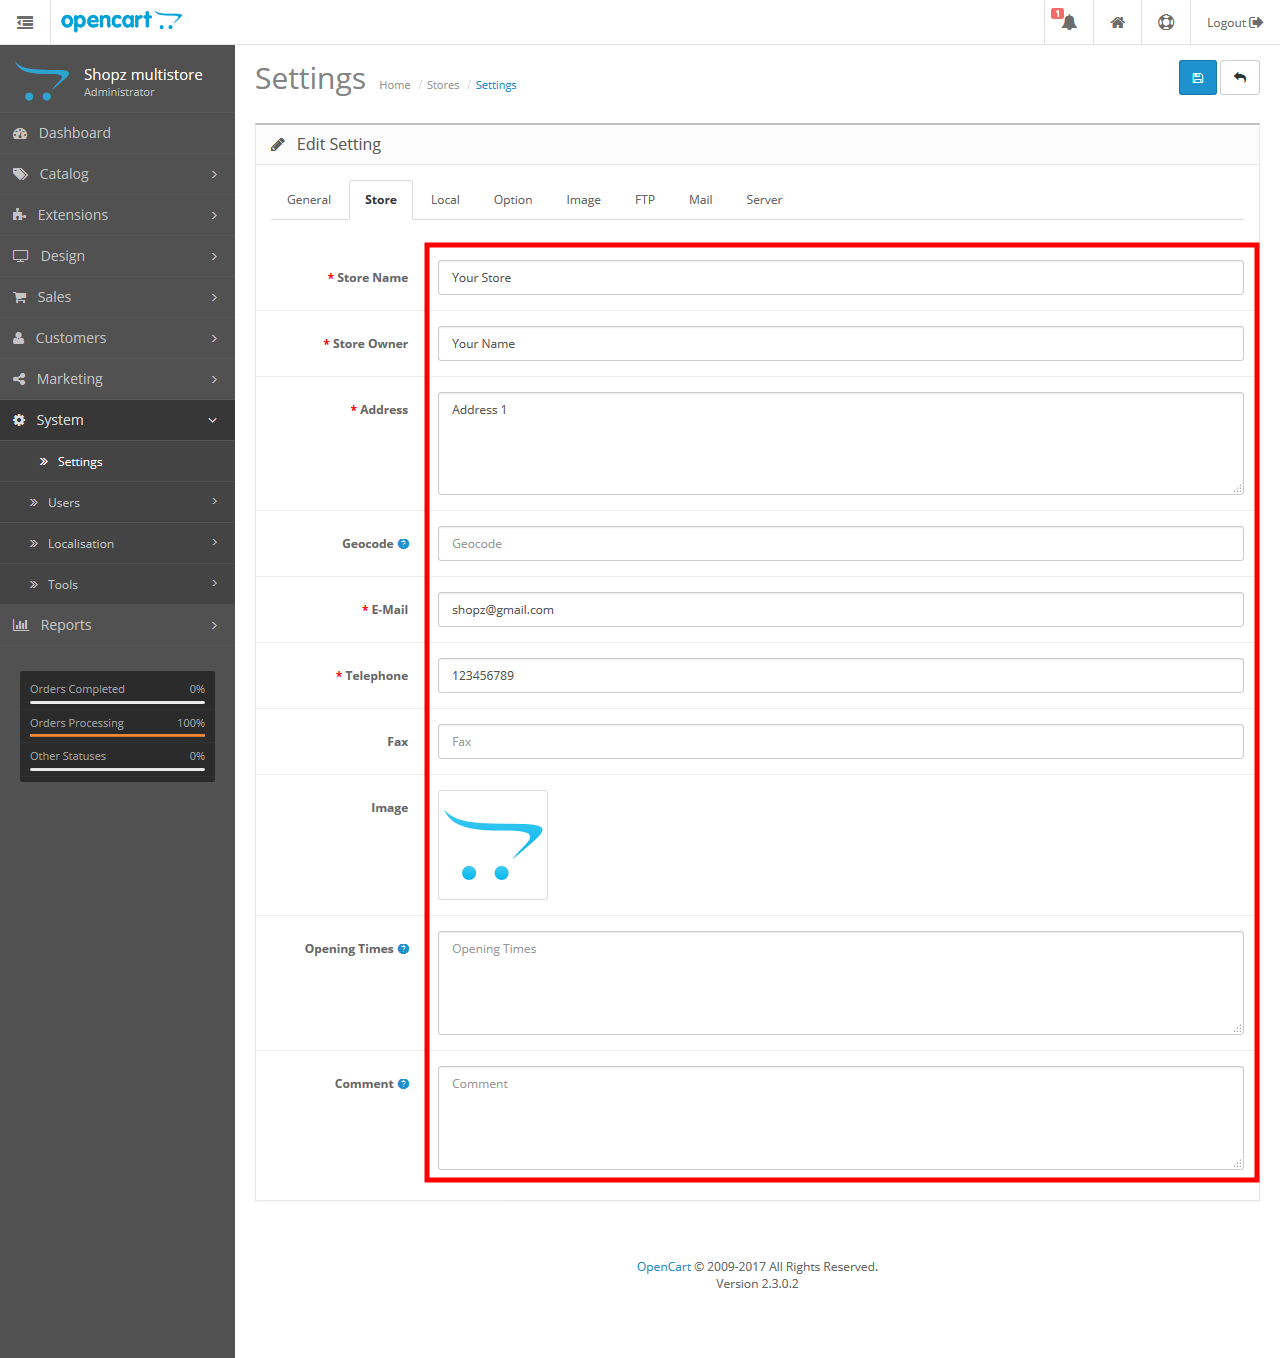
For Store setting
Go To System > Settings > Click on Your store Edit Button, and set below settings.
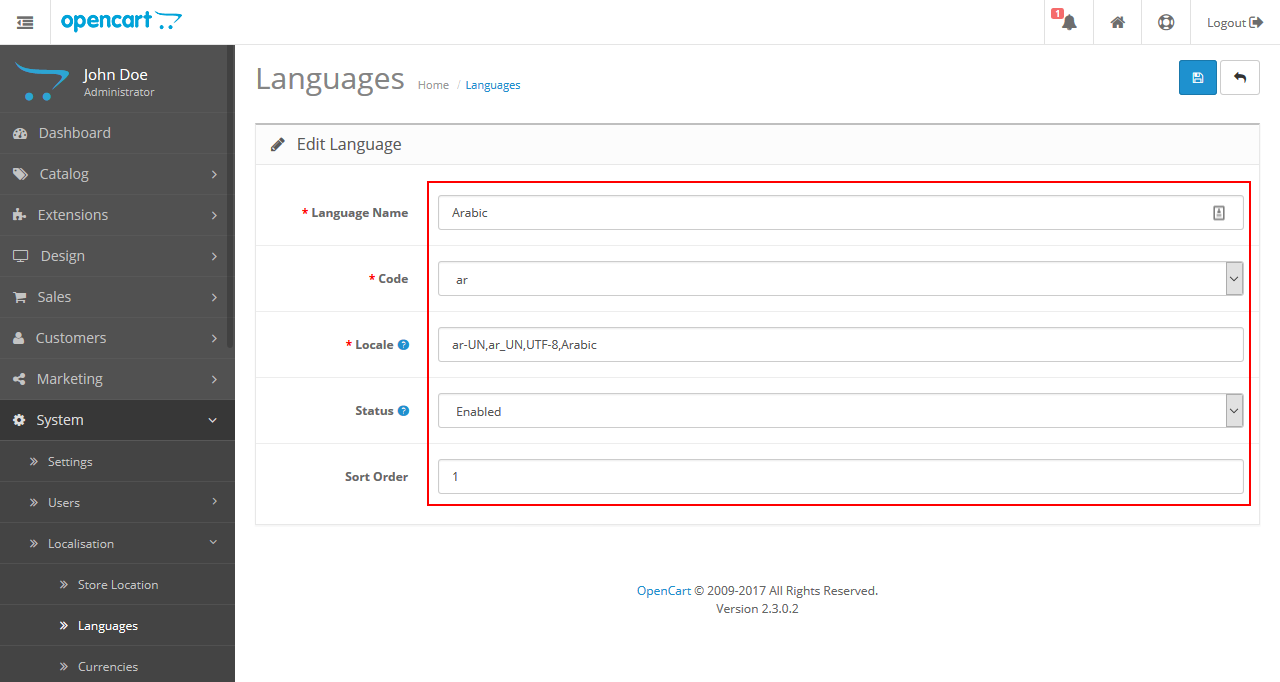
Step 3 : Language Settings
Enable Laguages login to your admin panel and do follwing settings.
For Example To Add Arabic Language
Go to System > Localisation > Languages,
Click on “Add New” button to add new Language
Language Name : “Add New” Arabic
Code : ar
Locale: ar-UN,ar_UN,UTF-8,Arabic
Status: Enable
Sort Order: 1
Click on “Save” button
Step 4 : All Module Installations
Content Top Modules
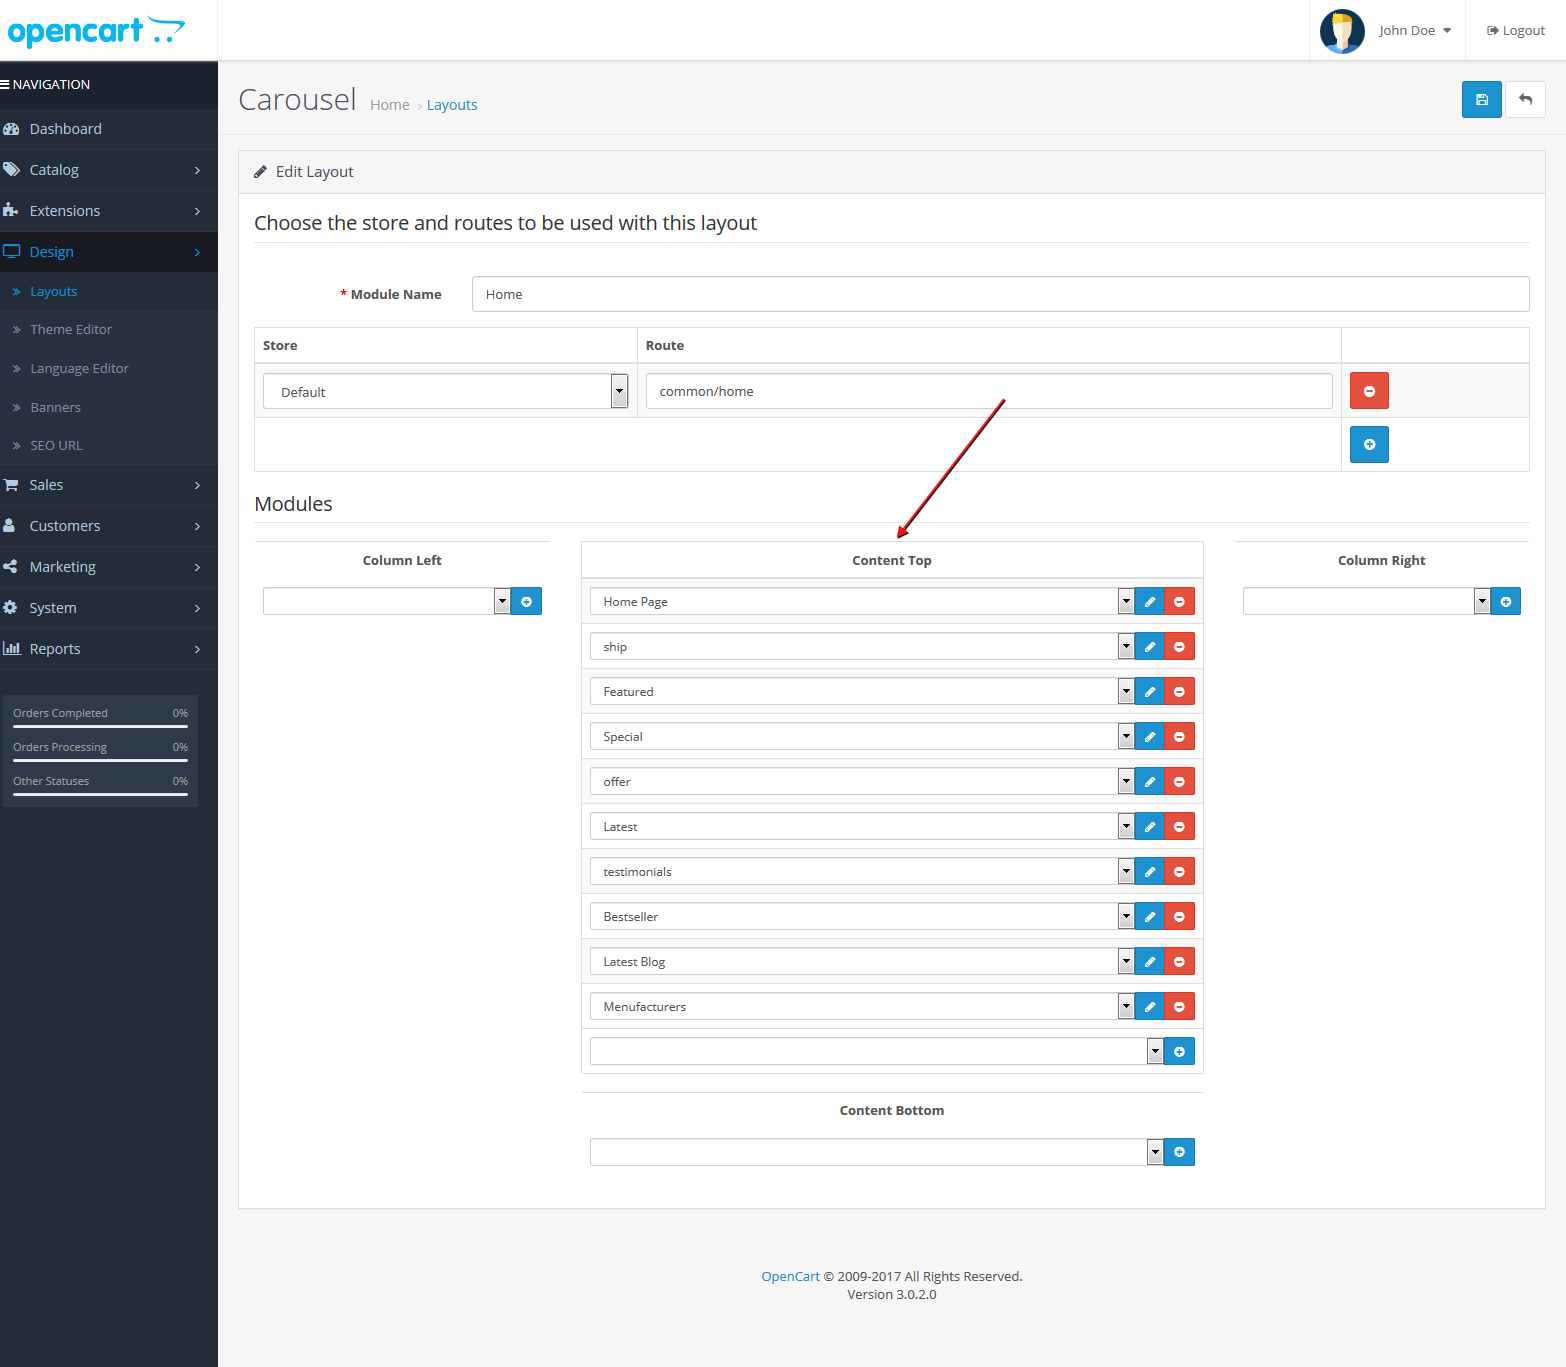
Step 4.1 : Module Name : Slideshow
For adding Slideshow banners
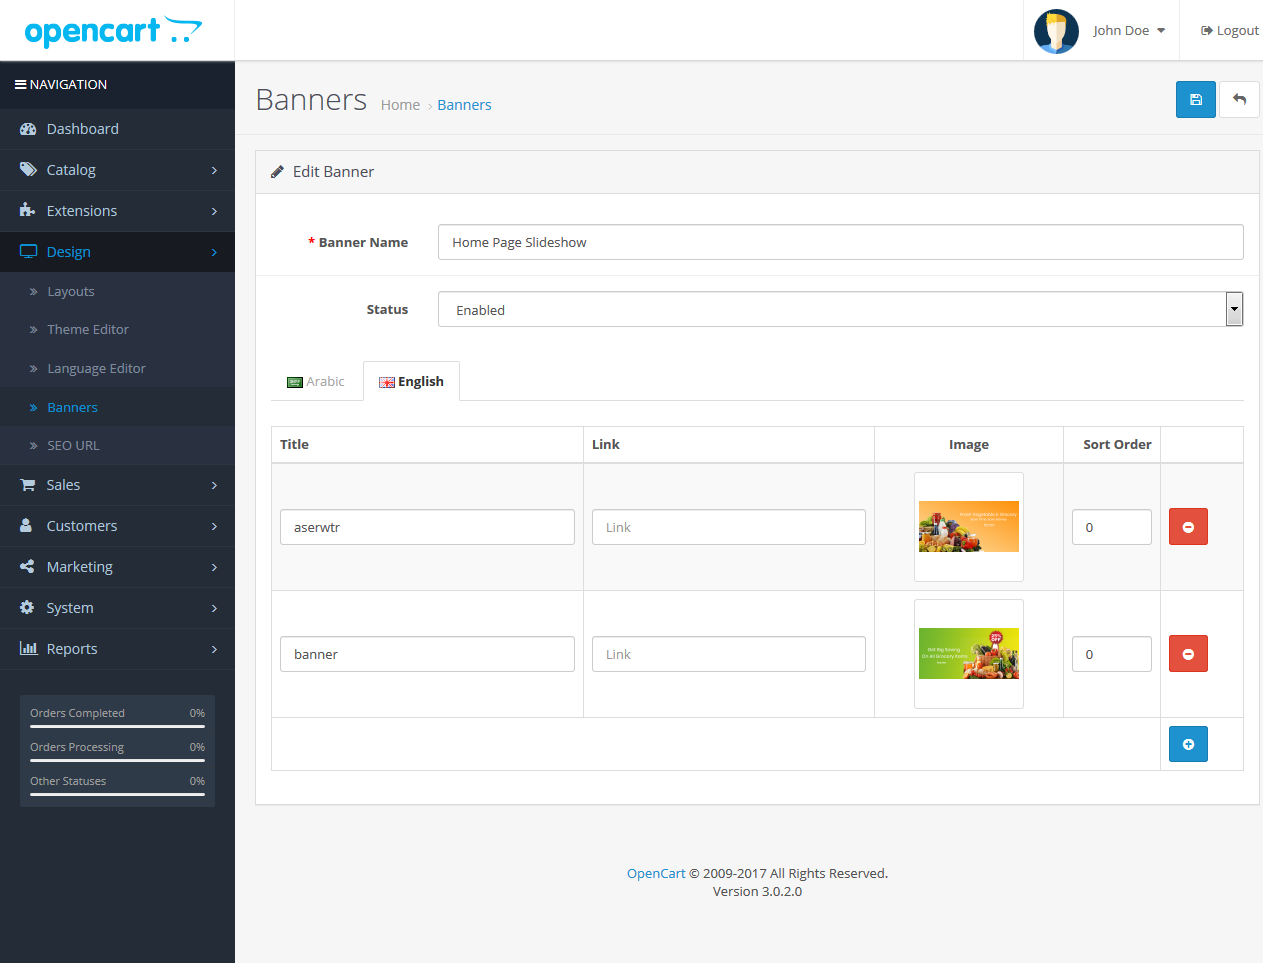
Go to Design > Banners
Click on Add New button for add new banner.
Now Give Banner name "Home Page Slideshow"
From status select " Enabled"
And click on “Add Banner” button.
Give title of your banner and click on image to upload your banner.
Again click on “Add Banner” button and upload another banners.
Now click on “Save” button.
Till Not complete process follow below steps
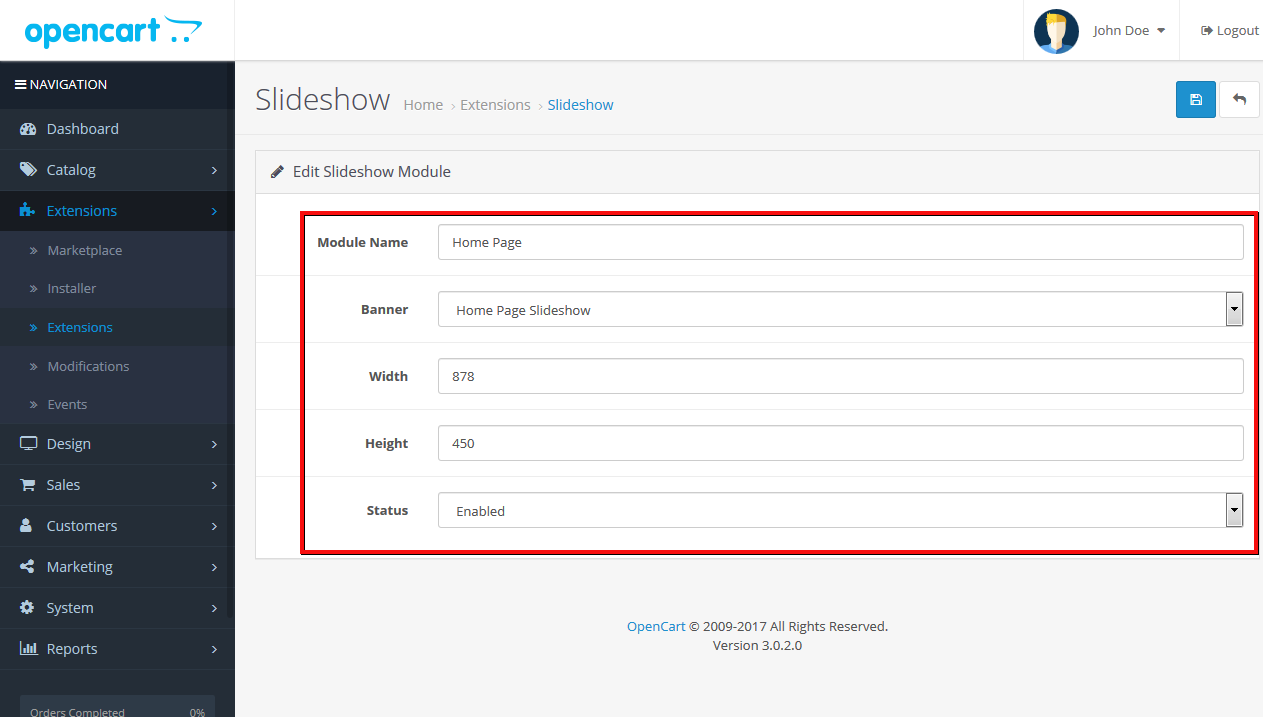
Now to activate your Main banner go to Extensions > Extensions > Modules > Slideshow click on Add New Button
Give Module name: "Homepage"
From banner select: "HomepageSlideshow"
Give Width & Height (878 X 450) (your banner Width and height)
From status select: "Enabled"
Now click on “Save” button
Step 4.3 : Module Name : Ship
Go to Extensions > Extensions > Modules > HTML Content > click on "Add New" Button
After Install Click On : "Add Button"
Give Module Name: Ship
Now In Description click on Code View button in text editor block and paste this code.
<!--ship -->
<!-- shipping start-->
<div class="inspire-bg">
<div class="d-to">
<div class="deliveryinfo container wow fadeInDown">
<div class="row">
<div class="col-lg-4  col-md-6 col-sm-6 col-xs-12 both">
<ul>
<li class="text-center main-icon"><span class="shipping"></span></li>
<li>
<h4>free Delivery</h4>
<p>Free shipping on all US orders</p>
</li>
</ul>
</div>
<div class="col-lg-4 col-md-6 col-sm-6 col-xs-12  both">
<ul>
<li class="text-center main-icon"><span class="black"></span></li>
<li>
<h4>money Back guarantee</h4>
<p>Shocking discount every sunday</p>
</li>
</ul>
</div>
<div class="col-lg-4 col-md-6 col-sm-6 col-xs-12  both">
<ul>
<li class="text-center main-icon "><span class="free"></span></li>
<li>
<h4>online support</h4>
<p>We support online 24 hours a day</p>
</li>
</ul>
</div>
</div>
</div>
<!-- shipping end -->
</div></div>
<!--ship end-->
From status select Enabled
Now click on “Save” button.

Step 4.2 : Module Name : Featured
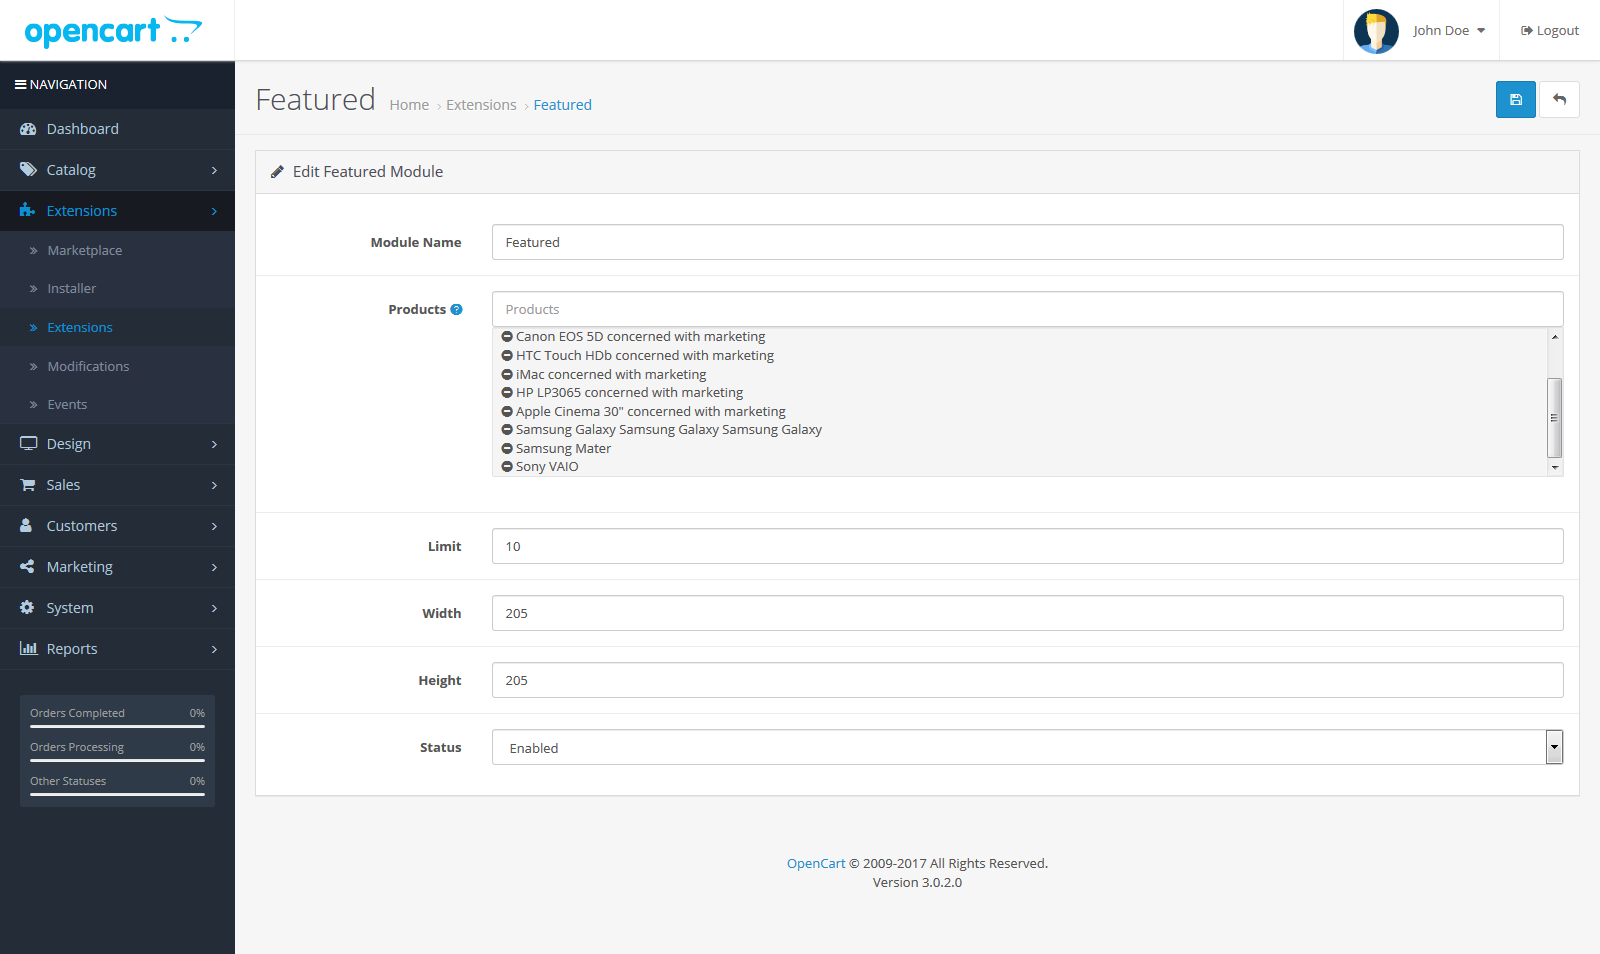
Go to Extentions > Extensions > Modules > Featured click on "install" button.
Give Module name: Featured
Select product as per your requirement
Give Limit 10 and Width & Height (205 X 205) (your product image Width and height)
From status select : Enabled
Now click on: “Save”button.
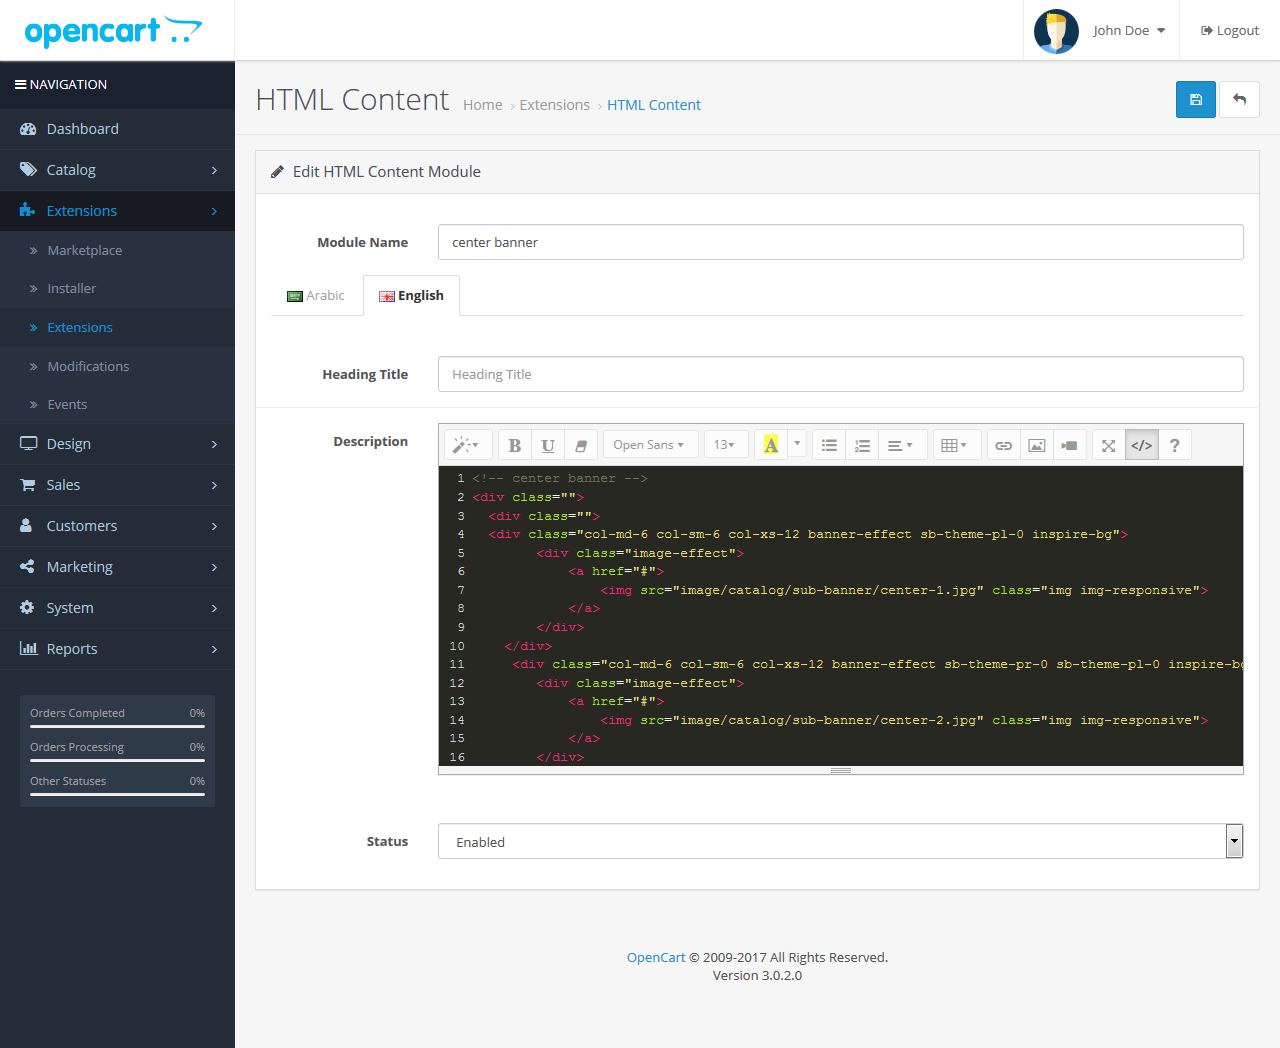
Step 4.3 : Module Name : center banner
Go to Extensions > Extensions > Modules > HTML Content > click on "Edit" Button
After Install Click On : "Add Button"
Give Module Name: center banner
Now In Description click on Code View button in text editor block and paste this code.
<!-- center banner -->
<div class="">
  <div class="">
  <div class="col-md-6 col-sm-6 col-xs-12 banner-effect sb-theme-pl-0 inspire-bg">
        <div class="image-effect">
            <a href="#">
                <img src="image/catalog/sub-banner/center-1.jpg" class="img img-responsive">
            </a>
        </div>
    </div>
     <div class="col-md-6 col-sm-6 col-xs-12 banner-effect sb-theme-pr-0 sb-theme-pl-0 inspire-bg">
        <div class="image-effect">
            <a href="#">
                <img src="image/catalog/sub-banner/center-2.jpg" class="img img-responsive">
            </a>
        </div>
    </div>
    </div>
</div>
<!-- center banner End -->
From status select Enabled
Now click on “Save” button.
Step 4.4 : Module Name : Special
Go to Extentions > Extensions > Modules > click on "install" button. (If not installed)
Give Module name: Special
Select product as per your requirement
Give Limit 10 and Width & Height (205 X 205) (your product image Width and height)
From status select : Enabled
Now click on: “Save”button.

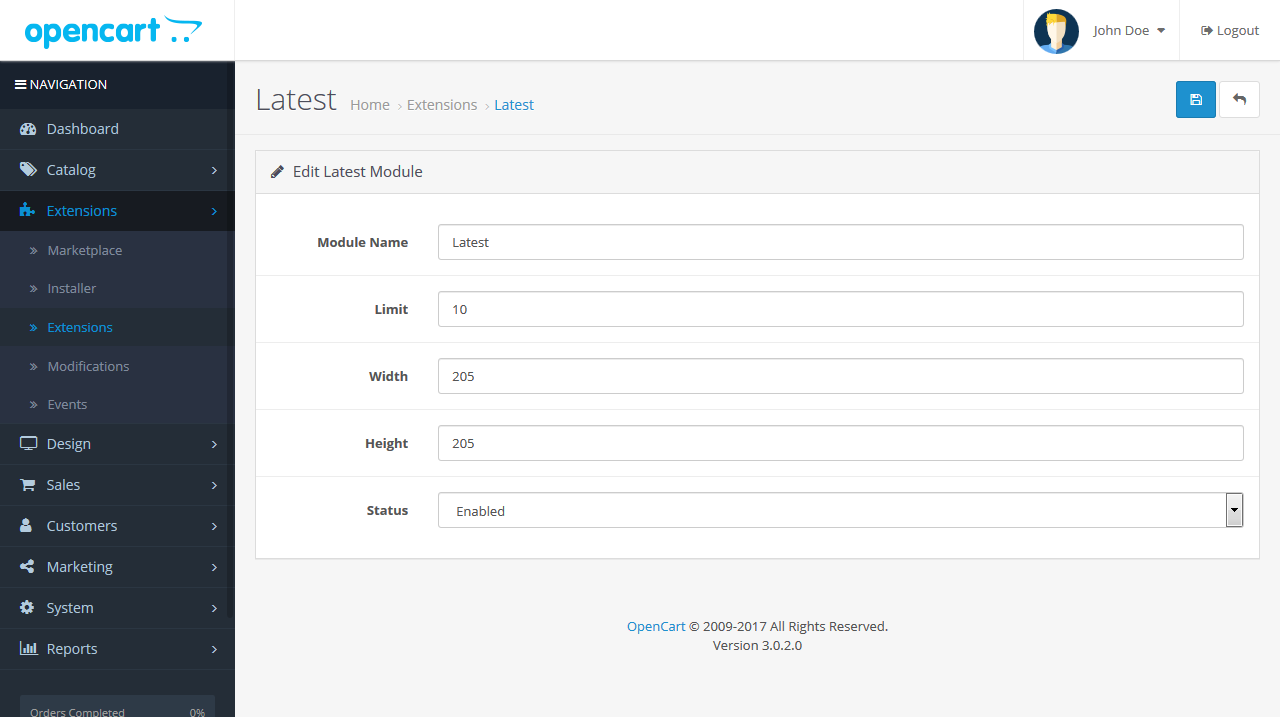
Step 4.5 : Module Name : Latest
Go to Extentions > Extensions > Modules > Latest click on "install" button. (If not installed)
Give Module name: Latest
Give Limit 10 and Width & Height (205 X 205) (your product image Width and height)
From status select : Enabled
Now click on: “Save”button.
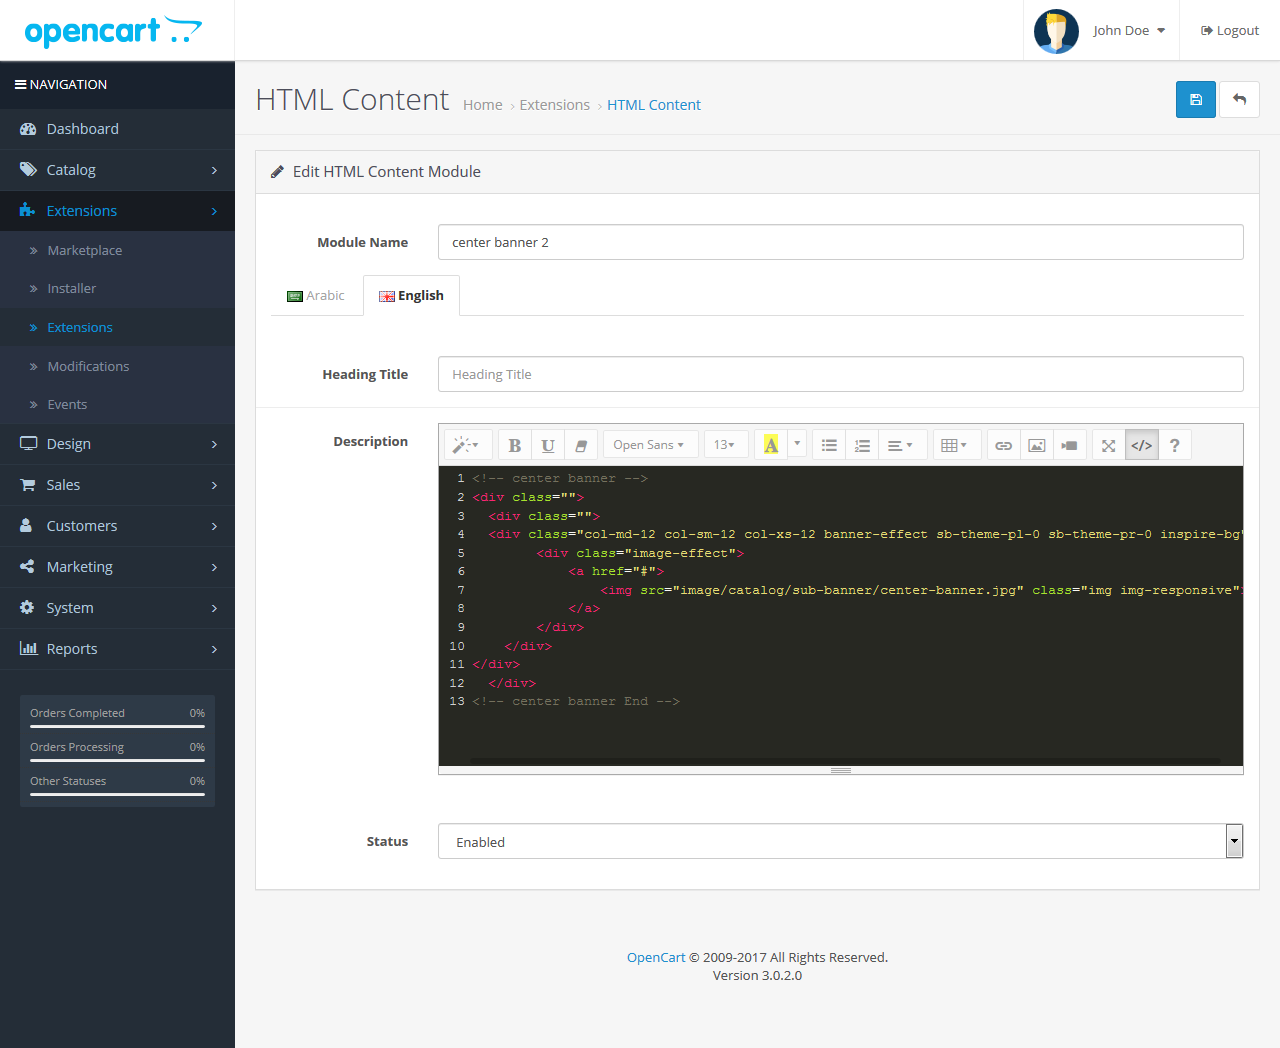
Step 4.6 : Module Name : center banner 2
Go to Extensions > Extensions > Modules > HTML Content >click on "Add New" Button
Give Module Name: center banner 2
Now In Description click on Code View button in text editor block and paste this code.
<!-- center banner -->
<div class="">
  <div class="">
  <div class="col-md-12 col-sm-12 col-xs-12 banner-effect sb-theme-pl-0 sb-theme-pr-0 inspire-bg">
        <div class="image-effect">
            <a href="#">
                <img src="image/catalog/sub-banner/center-banner.jpg" class="img img-responsive">
            </a>
        </div>
    </div>
</div>
  </div>
<!-- center banner End -->
From status select Enabled
Now click on “Save” button.
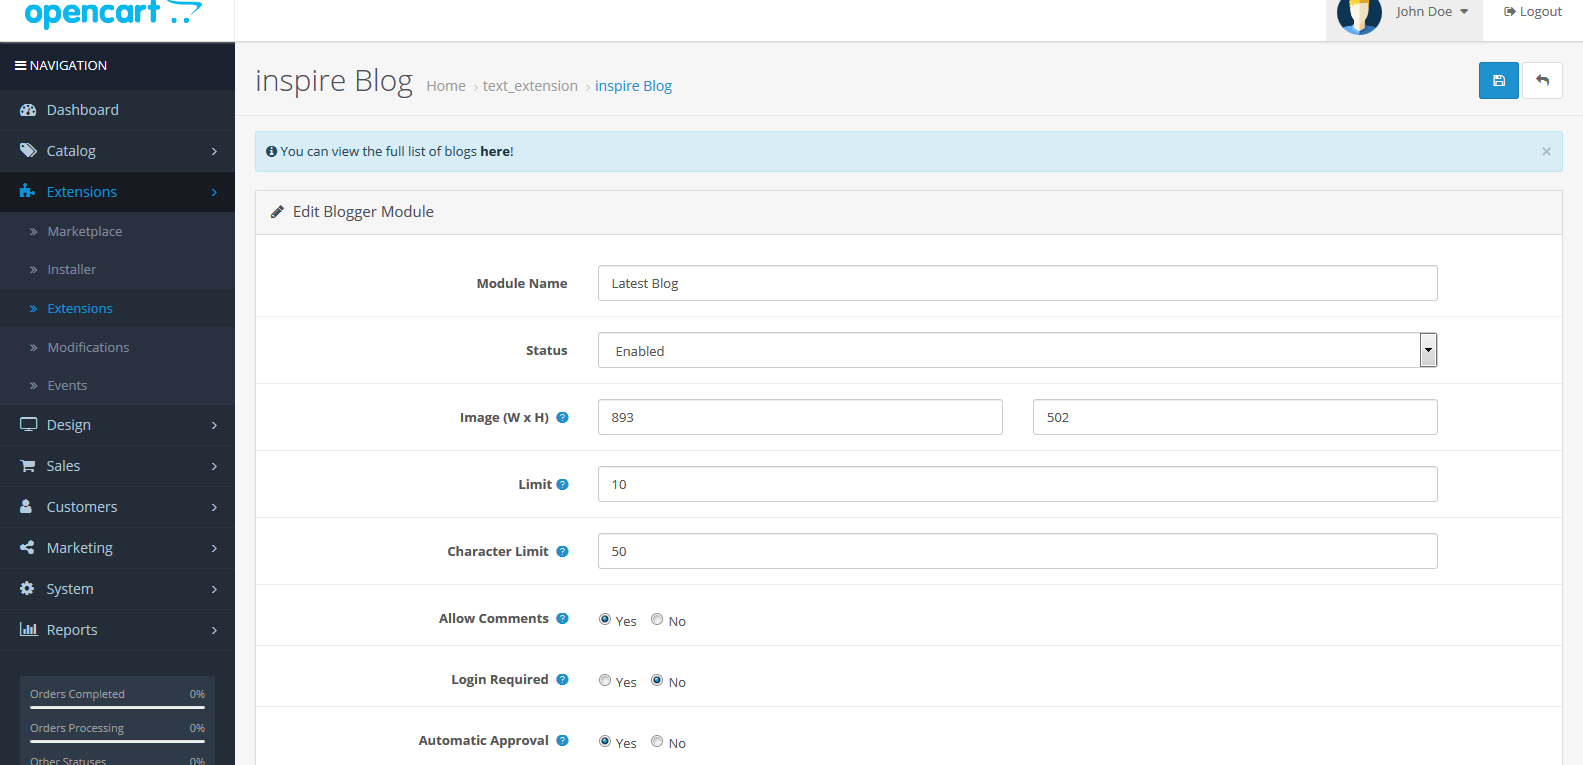
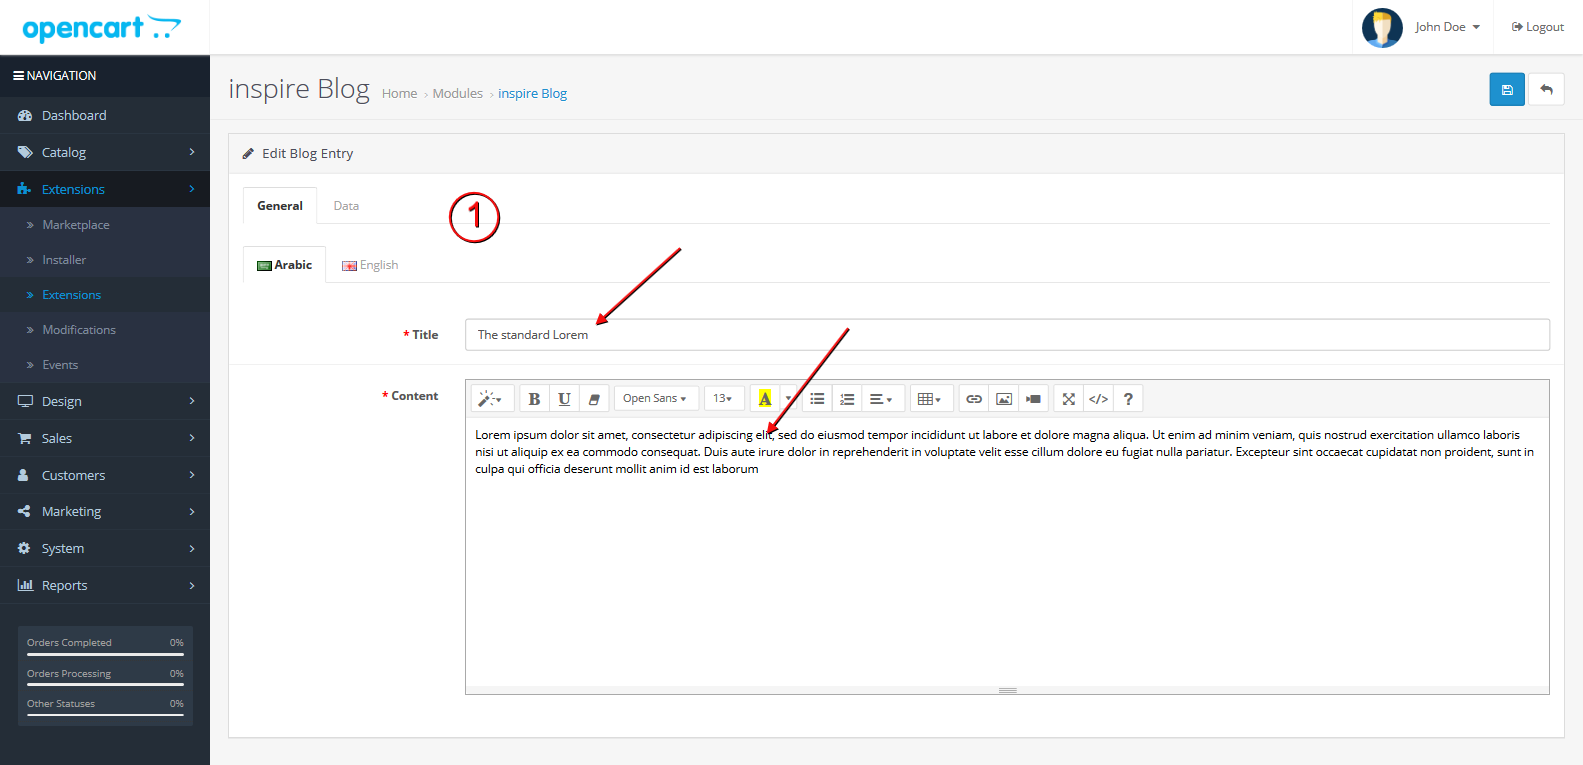
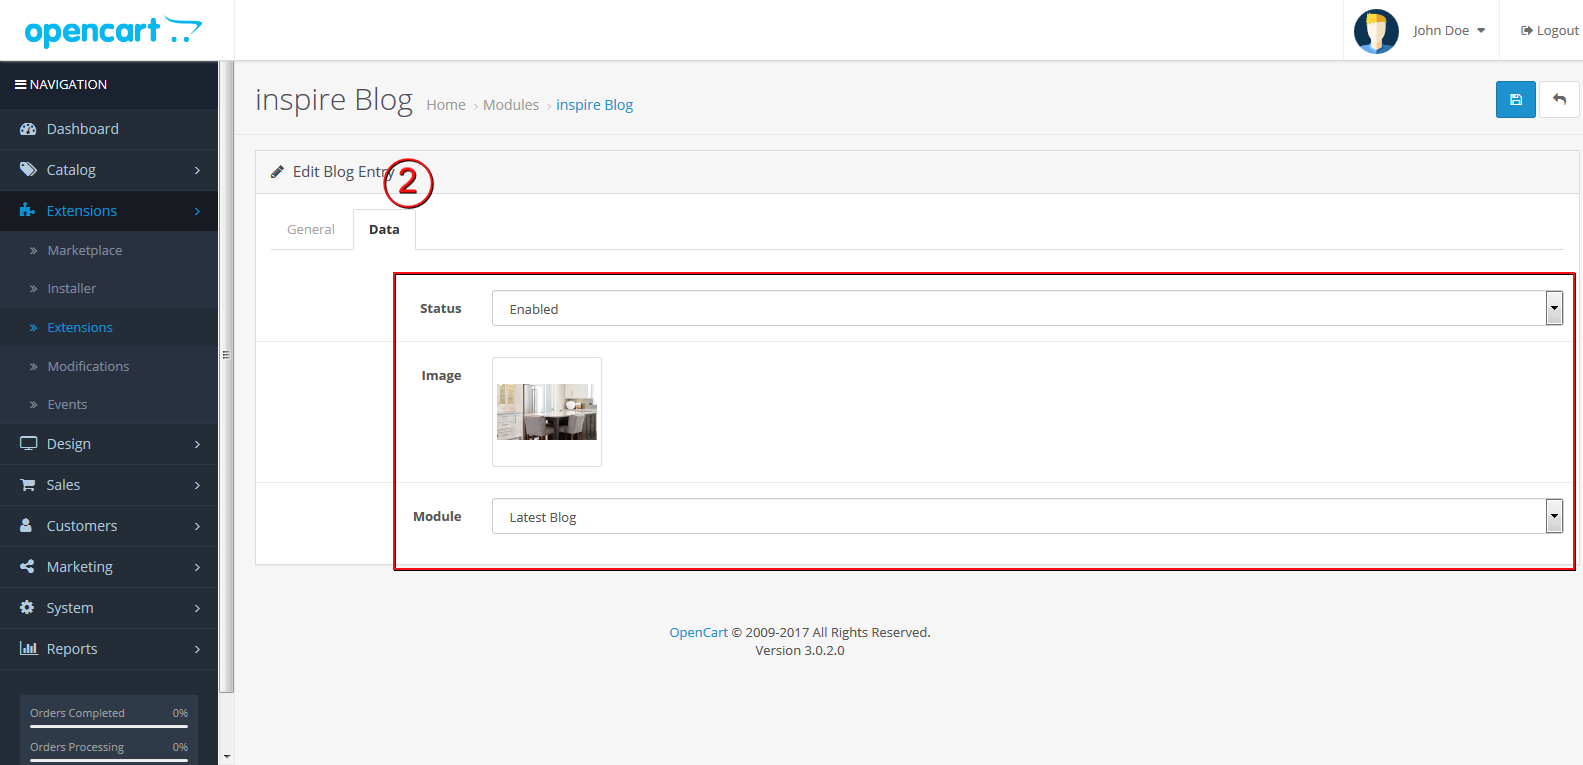
Step 4.8 : Module Name : Inspire Blog > Inspire Blog
Go to Extentions > Extensions > Modules > Inspire Blog click on "install" button.
Give Module name: Latest Blog
Give Limit 10 and Width & Height (892 X 600)
From status select : Enabled
Allow Comments : Yes
Login Required : No
Automatic Approval : Yes
Now click on: “Save”button.
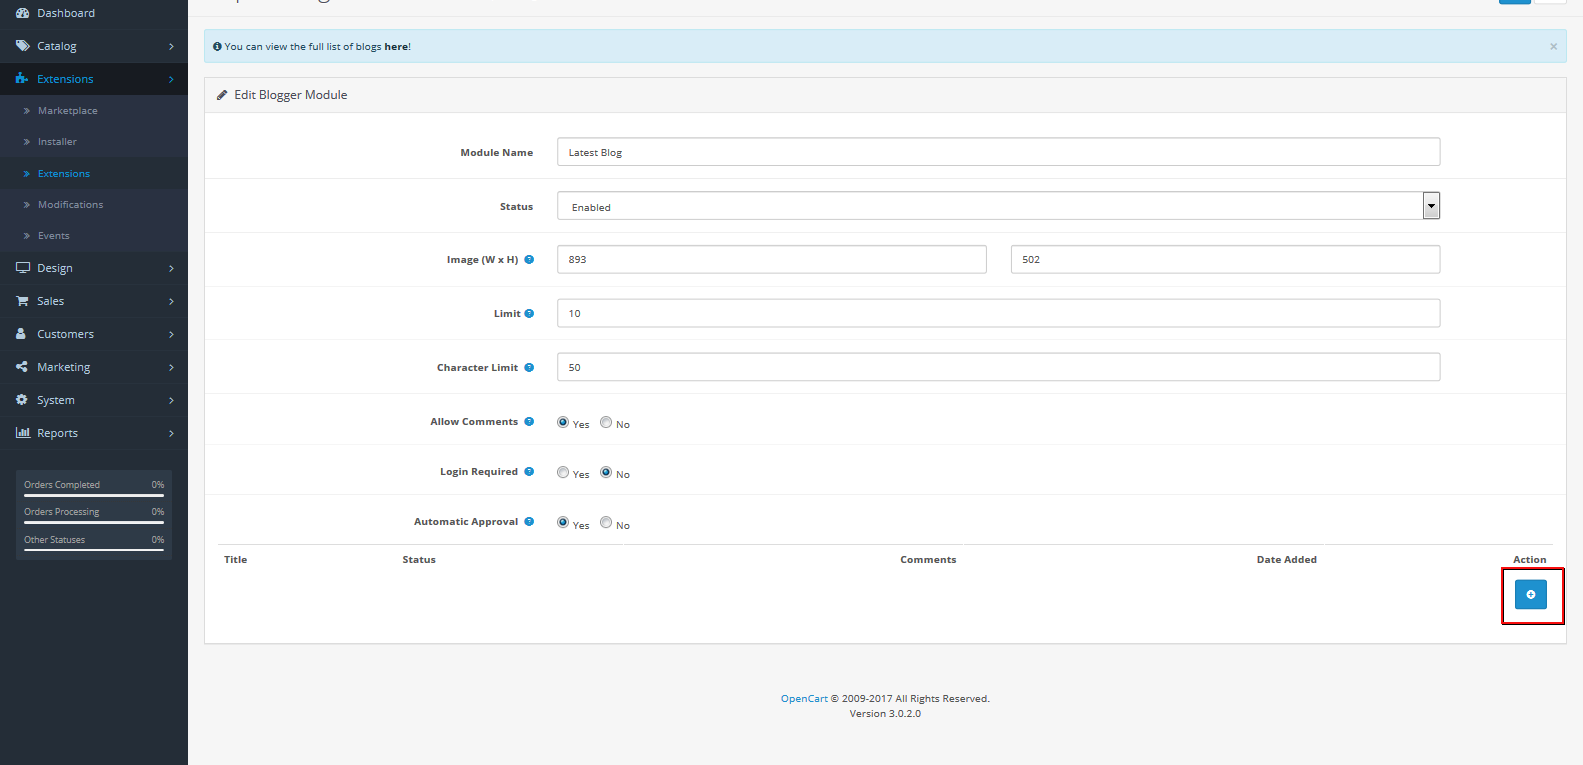
Go to Extentions > Extensions > Modules > nspire Blog click on "Latest Blog" button.
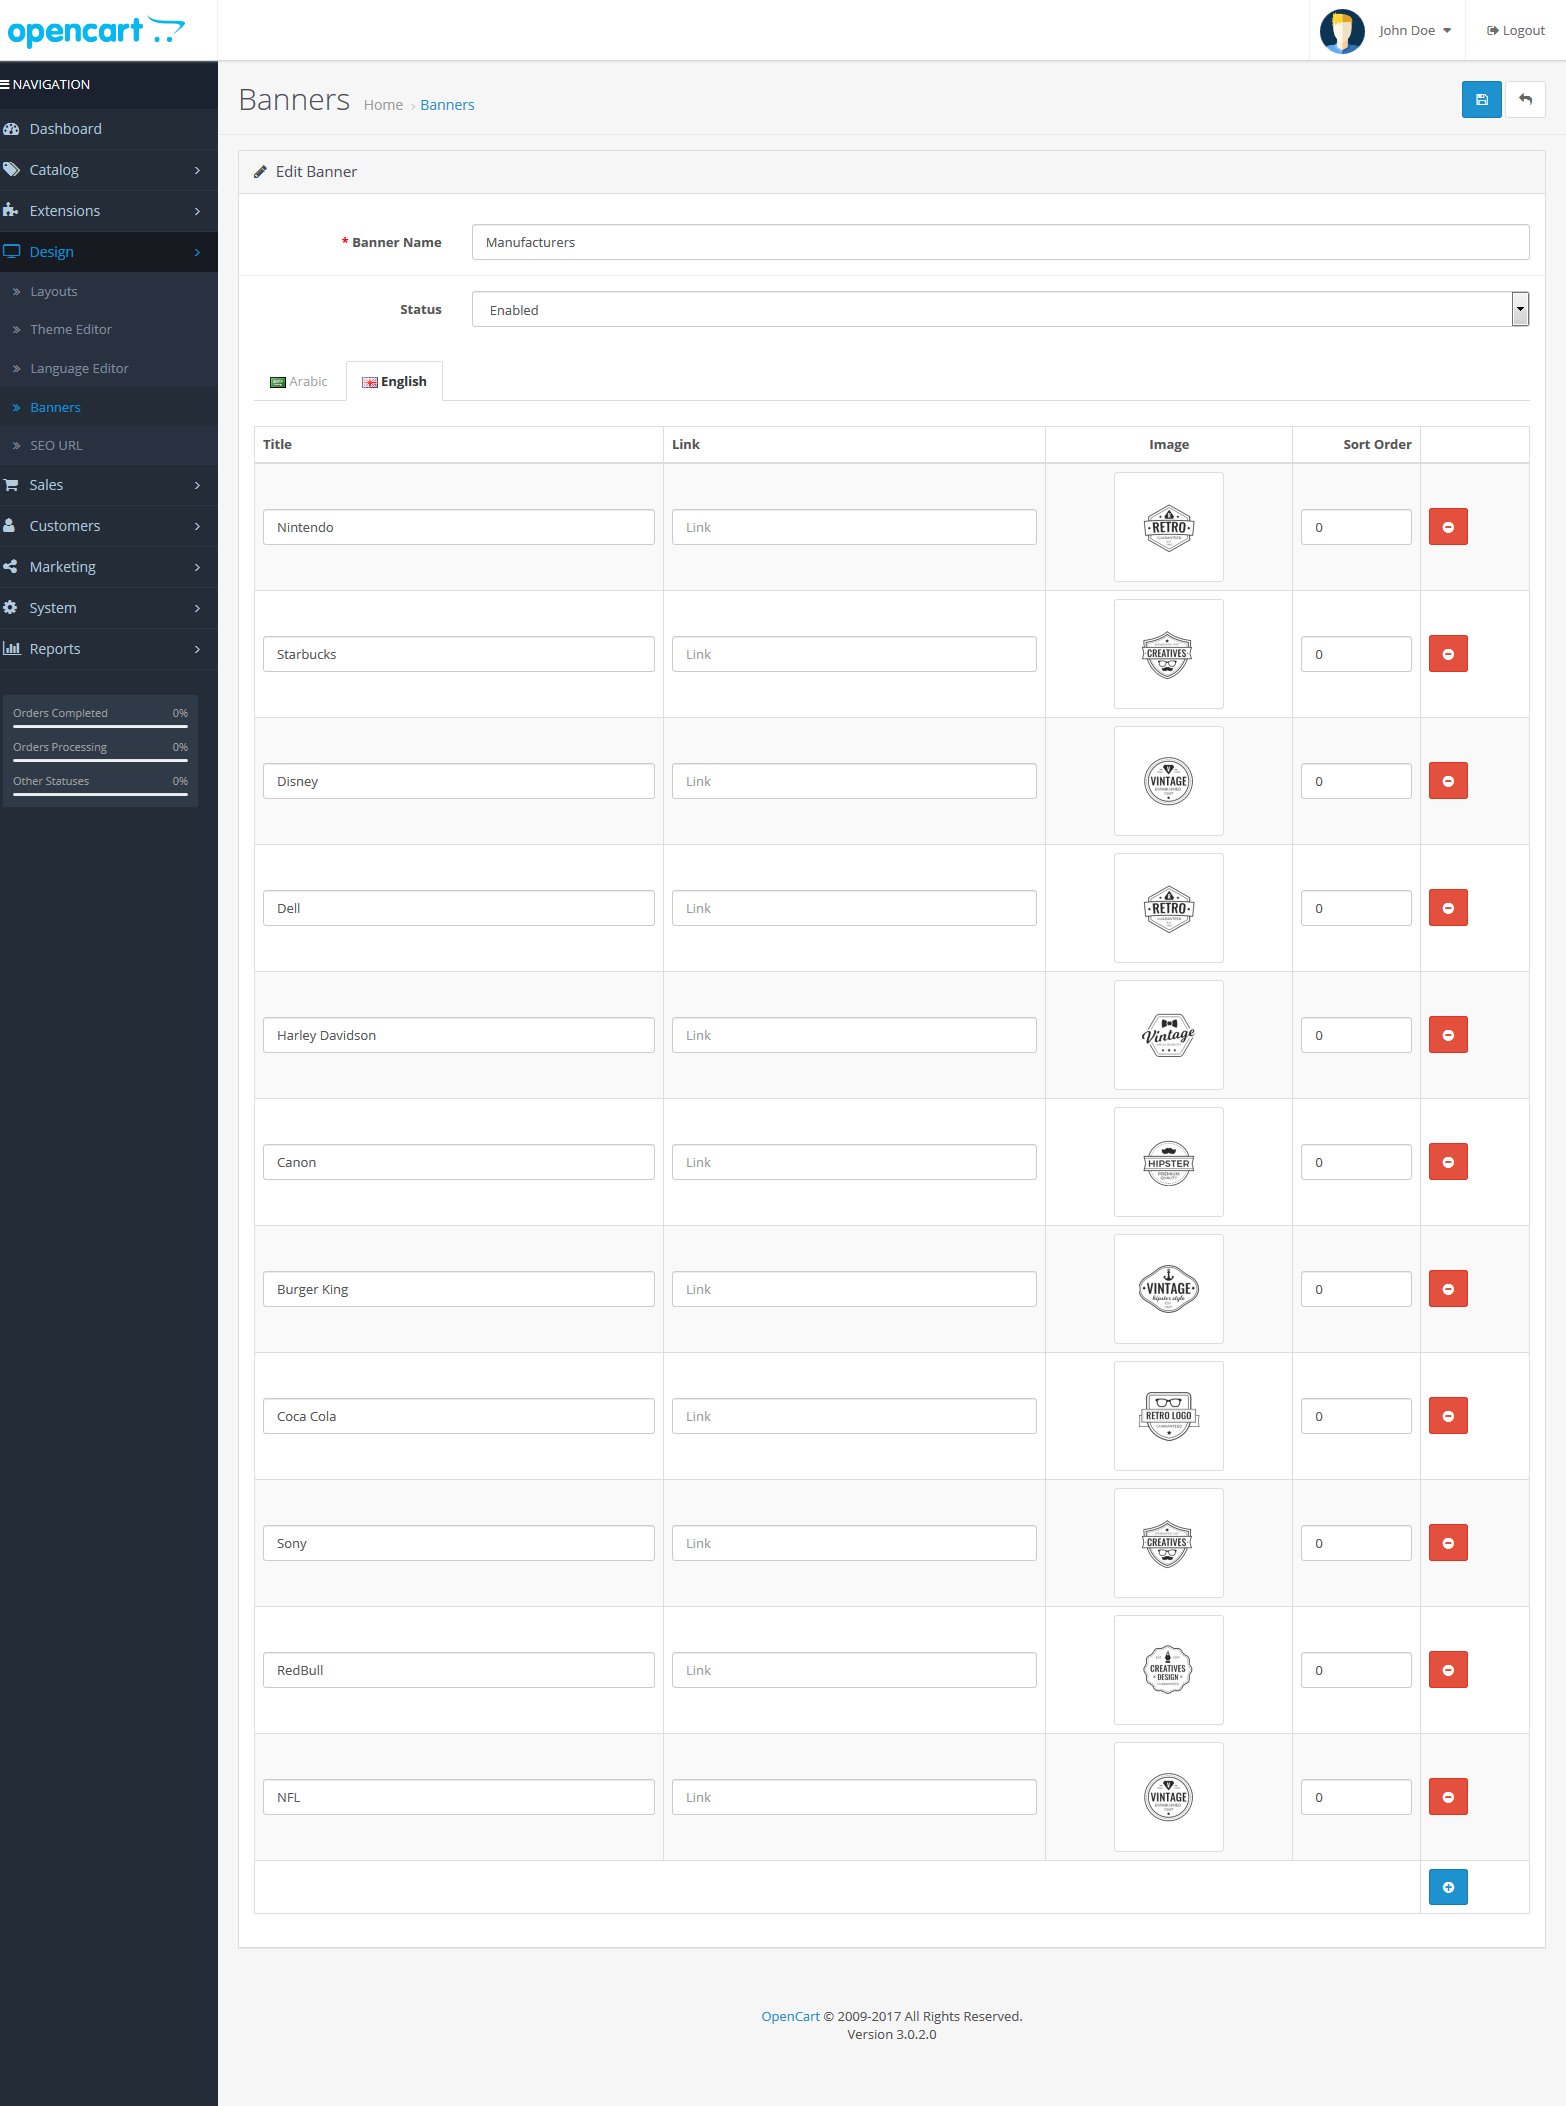
Step 4.1 : Module Name : Mefufracture
For adding Mefufracture Brand logo
Go to Design > Banners
Click on Add New button for add new brand.
Now Give Banner name "Manufacturers"
From status select " Enabled"
And click on “Add Banner” button.
Give title of your banner and click on image to upload your banner.
Again click on “Add Banner” button and upload another banners.
Now click on “Save” button.
Till Not complete process follow below steps
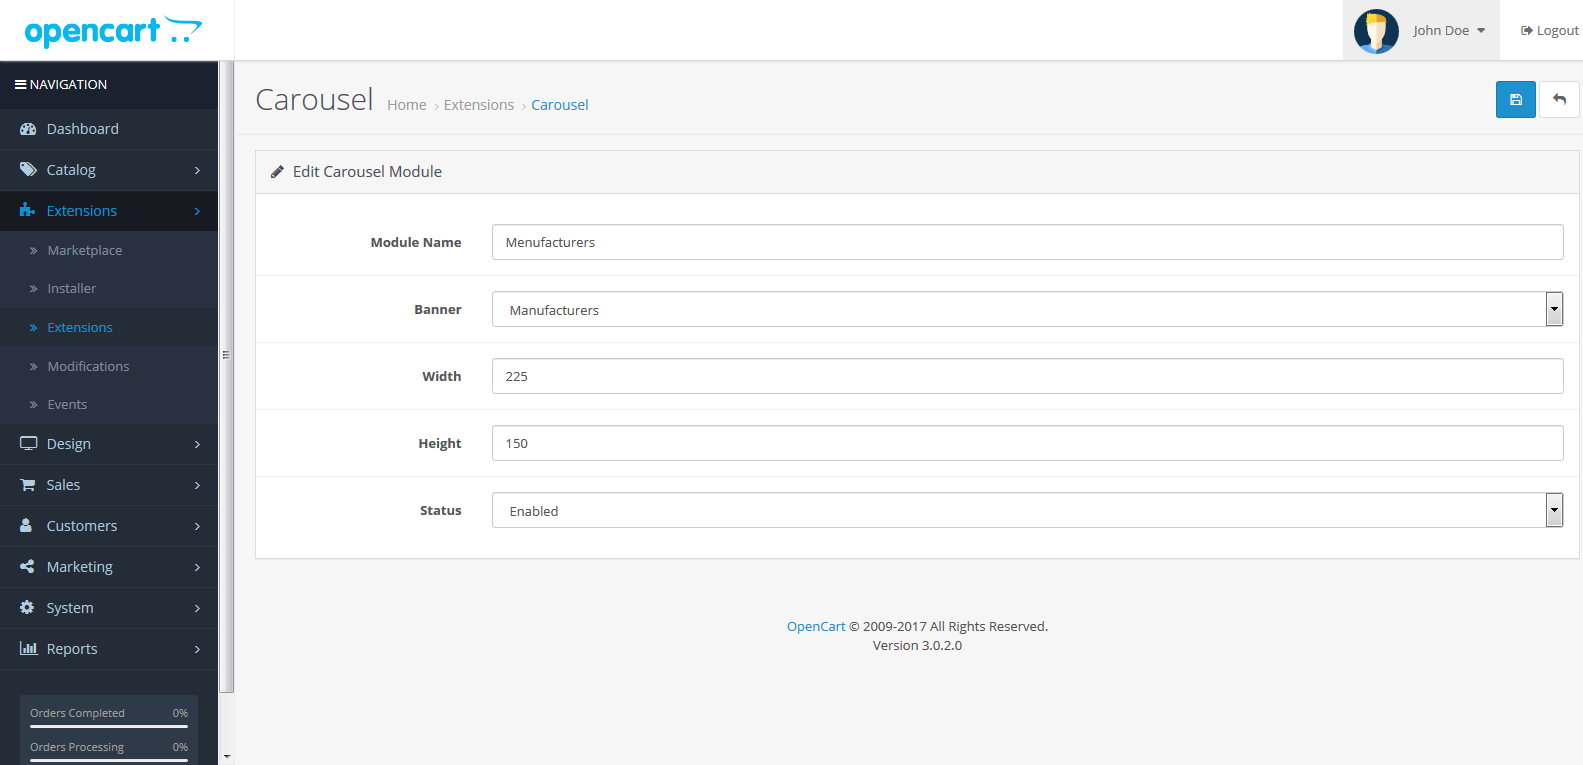
Now to activate your Main banner go to Extensions > Extensions > Modules > Carousel click on Add New Button
Give Module name: "Menufacturers"
From banner select: "Menufacturers"
Give Width & Height (225 X 150) (your banner Width and height)
From status select: "Enabled"
Now click on “Save” button